PowerShellノード

概要
RSエージェントが入っているクライアントに対して実行するPowerShellを設定する事が可能です。 Agentコマンド実行ノードと対で利用します。
動画
①インストール方法
②ファイルアップロード・ダウンロード
③RPA検索、ステータス取得、エージェント一覧取得
④パワーシェルの実行、スクリーンショットの取得
設定項目
| 必須 | 項目名 | 説明 |
|---|---|---|
| PowerShellスクリプトテンプレート | PowerShellのテンプレートをプルダウンで選択出来ます。現在準備中です。 | |
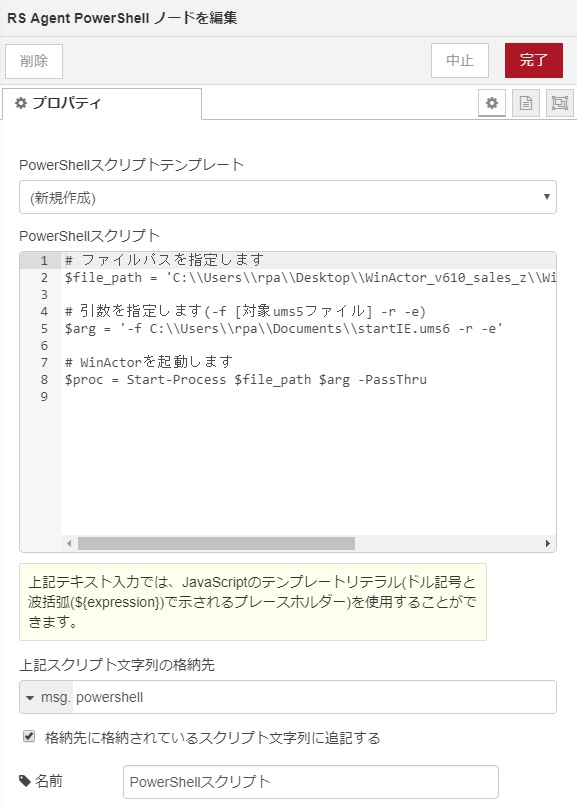
| PowerShellスクリプト | PowerShellスクリプトを記載します。コメントアウトの利用も可能です。またJavaScriptのテンプレートリテラル(ドル記号と波括弧(${expression})で示されるプレースホルダー)を使用することが出来ます。 | |
| 上記スクリプト文字列の格納先 | 格納先の変数名を設定します。 | |
| 格納先に格納されているスクリプト文字列に追記する | チェックをすると上記変数に値が入っていた場合に上書きをせずに追記をします。 |
サンプルスクリプト
下記のサンプルスクリプトで実際に動作を試す事が可能です。
下記の灰色の枠の右上にある□をクリックするとクリップボードにコピーできるのでコピーし、PowerShellスクリプトに貼り付けて利用してください
クライアントPCの再起動(強制再起動)
Restart-Computer -Force
メモ帳の起動
$processName = 'notepad'
Start-Process $processName
音声(英語)を流す
$null = [Reflection.Assembly]::LoadWithPartialName("System.Speech")
$SMSpeaker = new-object System.Speech.Synthesis.SpeechSynthesizer
$SMSpeaker.Speak("Hello World!")
クライアントPCのスクリーンショット取得
[Reflection.Assembly]::LoadWithPartialName("System.Drawing")
function screenshot([Drawing.Rectangle]$bounds, $path) {
   $bmp = New-Object Drawing.Bitmap $bounds.width, $bounds.height
   $graphics = [Drawing.Graphics]::FromImage($bmp)

   $graphics.CopyFromScreen($bounds.Location, [Drawing.Point]::Empty, $bounds.size)

   $bmp.Save($path)

   $graphics.Dispose()
   $bmp.Dispose()
}

# モニタサイズに合わせて1920, 1080)の箇所を変更してください。
$bounds = [Drawing.Rectangle]::FromLTRB(0, 0, 1920, 1080)

# C:\tempフォルダが存在しない場合は実行前に作成しておいてください。
screenshot $bounds "C:\\temp\\foo.png"
スクリーンショット取得に関して
取得したスクリーンショットはAgentコマンド実行ノードでget-fileを実行する事でスクリーンショットイメージの取得が可能です。
WinActorの実行(一例です)
# ファイルパスを指定します
$file_path = 'C:\\Program Files (x86)\\WinActor\\WinActor.exe'

# 引数を指定します(-f [対象ums6ファイルパス] -r -e)
# 例) $arg = '-f C:\\Users\\comsq\\corobo_demo\\WinActor\\OperateNotepad.ums6 -r -e'
$arg = '-f ${msg.winactorFilePath} -r -e'

# WinActorを起動します
$proc = Start-Process $file_path $arg -PassThru
ロボコンの実行(一例です)
# 実行ファイルのフォルダパスを指定します
$script_dir_path = 'C:\\Users\\comsq\\\corobo_demo'

# 実行ファイルパスを指定します
$file_path = $script_dir_path + '\\corobo_rbf_demo.rb'

# 状態ログファイルを作成します(シナリオスクリプトの変更が必要になります)
# $status_log_path = $script_dir_path + '\\corobo_rbf_demo.status'
# $status_text = 'START'
# Set-Content -Force -path $status_log_path -value $status_text
# Start-Sleep -s 5

# 実行ファイルをRubyで実行(ロボコンを起動)
& 'C:\\Program Files\\Ruby-2.4-x64\\bin\\ruby.exe' $file_path
PowerShellテンプレート
随時テンプレートは増やしていく予定です。 テンプレートのご要望などはお問い合わせからご連絡ください。